


CRAFTY HOW-TO: embroidery hoop picture frame
As introduced a little while ago, Rina is keeping her crafty how-to column going at She Does the City. Check out this very simple yet highly cute project from a recent post:
by Rina Grosman
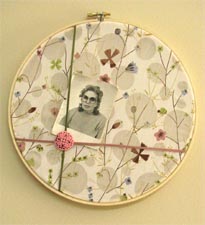
Not just for embroidery anymore; these hoops are perfect for displaying beautiful fabrics that you may not have enough of to complete a project. It’s also a great way to hang photos without the traditional wooden frame. You can find hoops in all different sizes and they’re only a couple of dollars each. The metal screw at the top acts as a hanging device so you don’t have to worry about attaching one later on!
Materials:
Embroidery hoop
Needle and thread
Fabric
Ribbon
Button
White glue
Step 1: Place inner hoop underneath fabric.
Step 2: Place outer hoop on top of fabric sandwiching the fabric between the two hoops.
Step 3: Place two pieces of ribbon on top of stretched fabric criss-crossing each other.
Step 4: Turn the hoop around and cut excess fabric down to 1/2”. Glue down the extra fabric to the inner hoop (this will keep it from showing and running).
Step 5: Sew on the button where the two ribbons meet, keeping the ribbon from moving.
You can add additional ribbons depending on the size of the hoop, so that you can display many photos.
For images of the process, check out the original project post.
posted by toronto craft alert at 9:10 a.m.
![]()
![]()


0 Comments:
Post a Comment
<< Home